Report templates
A report template defines how selected operational information becomes a document. Authors maintain templates in Operations Studio → Document Templates. Operators use published versions from their operational context. The resulting documents belong to the records they describe.
You need access to design templates and read their source data. Publishing requires the corresponding publishing permission. Select the intended site and environment before starting.
Create a template
- Create a document template in Operations Studio.
- Choose a starter such as a job traveller, inspection certificate or spare-parts catalogue, or start from scratch.
- Give it a recognisable name that describes its purpose, such as “Equipment inspection summary”.
- Select the information source and whether the document covers one record or a collection.
- Choose the document language and add the elements you need.
Supported sources include maintenance orders, production orders, materials, work centres, submitted forms and curated spare-parts catalogues. The source determines the fields and repeating collections available in the editor. Submitted-form sources refer to existing historical submissions. Standalone Form authoring and new capture are retired; build new input workflows in Apps and choose a currently supported report source.
Changing the information source replaces incompatible source-specific fields and tables. Review the layout again after changing it. Record collections are explicit selections; they are not a scheduled query or an automatic report of everything in a date range.
Build the layout
Use Add element, select an element on the canvas and edit its settings in Configuration.
| Element | Use it for |
|---|---|
| Details | Selected values from the source record, with a full-width or two-column field layout. |
| Table | Repeating records, operations, answers or parts, with selected columns. |
| Text | Reusable instructions, explanatory paragraphs or headings. |
| Image | An uploaded logo, drawing or photograph with an optional caption. |
| Illustrated parts | Curated photographs and their associated parts from a catalogue source. |
| Page break | Starting the next element on a new PDF page. |
Move elements with their drag handle or the move controls. For keyboard sorting, focus the handle, press Space, use the arrow keys and press Space again; Escape cancels. Drag to the left or right of another element to arrange them side by side, using the destination preview before dropping.
The inspector has Structure, Configuration and Layout. Structure selects elements and layout groups; Layout controls direction, spacing and content/fill/fixed sizing. Resize selected elements on the canvas or set their dimensions in Layout. Double-click the resize control to return to content sizing. Existing full/half/third-width sections remain supported.
Use a page break when the next element needs a new PDF page. Long tables can continue onto later pages. Prefer content sizing for variable text and check the downloaded PDF after fixed-height or side-by-side layout changes; the interactive canvas is not the final pagination check.
Choose only the fields that the reader needs. For historical submission photos and signatures, use a details element rather than a table column. Upload template images through the image settings; supported formats are PNG, JPEG and WebP, up to 2 MB. Catalogue photographs stay associated with their source parts and are configured through the catalogue workflow.
Set the subtitle, accent colour, footer and missing-value display in the template settings. Missing-value text changes presentation only: it does not supply a missing material, quantity or inspection result.
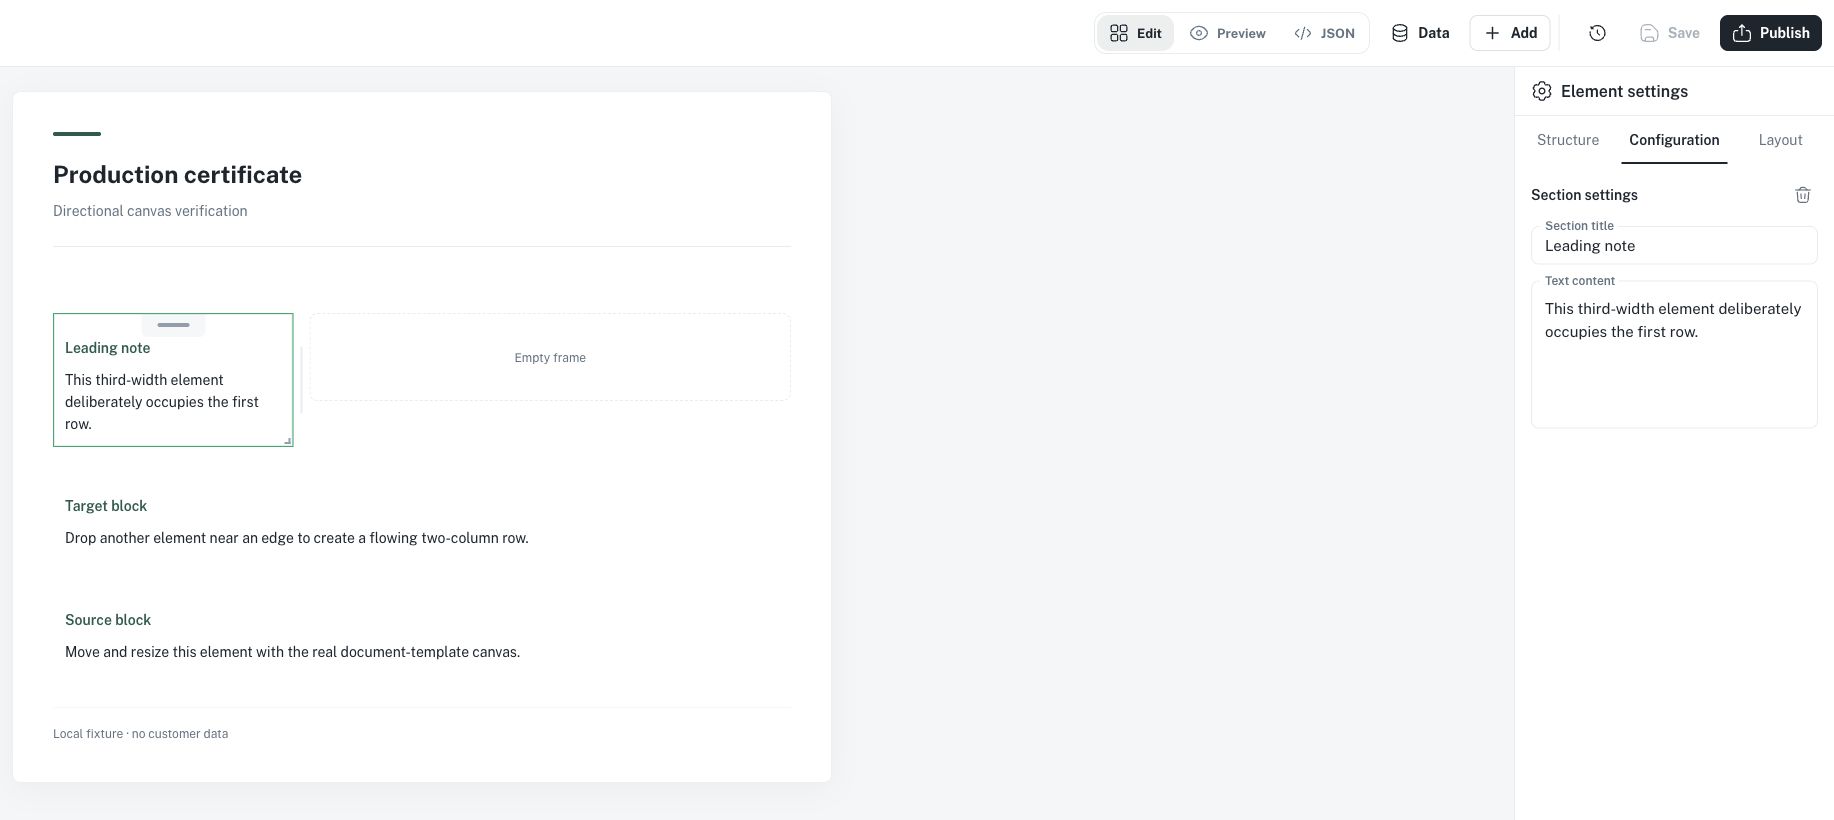
English interface with a synthetic layout example. The selected section is edited in the inspector; this is a layout example rather than a completed certificate. Select the image to view it at full size.
Preview with representative data
Choose real example records in the preview data controls, then update the preview. Check both a typical record and one with long text, missing optional values or multiple rows. Preview records are not stored as the template's fixed data selection when you publish it.
Before publication, check:
- Field labels and bindings describe the intended information.
- Tables and illustrations include the required rows and images.
- Text is readable at the chosen widths and page breaks make sense.
- Optional information is handled clearly without placeholder authoring instructions.
- The document language and reusable text are correct.
After publication, create a test report and inspect its downloaded PDF as well as the on-screen preview.
Save and publish
Save changes stores the editable template draft. Publish template creates the publication that report creation can use. Editing a published template leaves the previous publication available until you publish the new draft.
Existing reports keep their captured template version. A publication does not update previously created reports. Historical Form outputs retain their captured publication. They are not a path for configuring new submissions after Form retirement.
Template publication and report finalisation are independent. Publishing makes a layout available; finalising fixes one generated document.
History and advanced editing
Template history contains immutable publications. Open a historical version to review it, or restore it into a new editable draft. Restoration does not replace the current publication or rewrite generated reports. Review and publish the restored draft if it should become the version used for new reports.
Edit JSON exposes the same document definition as the canvas. It is structured configuration, not executable JavaScript or JSX. Invalid JSON is retained for correction, while the canvas shows the last valid layout; fix the errors before saving or publishing. Save before reloading or closing the browser.
For operational use, see Working with reports. For App and historical document workflows, see Report workflows.